
Caldercraft's 1:72 Scale HMS Victory
Page 1 of 1

Caldercraft's 1:72 Scale HMS Victory
![]() Dave Tue Sep 18, 2012 3:32 pm
Dave Tue Sep 18, 2012 3:32 pm
Caldercraft's 1:72 Scale HMS Victory
This is what Jotika/Caldercraft have to say about this model.
After more than two years of extensive research and development, using information and sources previously unavailable, this is the most historically accurate, highly detailed kit of Victory in her Trafalgar condition available.
Our model is very different to other manufacturers, and the amendments are the result of our own research verified by Mr. Peter Goodwin, and further research provided by Mr. Goodwin.
Mr. Goodwin is the Keeper and Curator of H.M.S. Victory in Portsmouth and is currently heading the project, researching Victory's true Trafalgar configuration. It is the intention of the Navy to restore Victory to this configuration by the 2005 bicentennial celebrations. Details of the planned amendments were due for release today but have been delayed until October 21st this year. As soon as this information is available it will be posted on our web site.
Forever associated with Nelson's last battle, H.M.S. Victory is one of the most famous ships of all time, and is now preserved as a major part of the Royal Naval Museum in Portsmouth. The ship's survival is particularly appropriate since Victory is not only an example of the ultimate sailing warship ~ the three decker First Rate ~ but she was also the most popular and successful 100-Gun ship of the period.
Forty years old by the time of Trafalgar (1805), she had been the flagship of half a dozen Admirals, and was to continue in active service until 1812.
This was not the first ship of the Royal Navy to bear the name Victory, there were in fact four predecessors:
1. The first Victory was built in 1559. In 1586, she was rebuilt to 800 tons and carried 34 guns with a crew of 750. At the defeat of the Spanish Armada in 1588, she was the flagship of Sir John Hawkins.
2. Phineas Pett designed the second Victory. She was built at Deptford and launched in 1620. Rebuilt in 1666 to 1029 tons and carried 42 guns and a crew of 500.
3. The Royal James of 1675 was renamed the third Victory in 1691. She was rebuilt in 1695 to 1486 tons and carried 100 guns and a crew of 754.
4. The fourth Victory suffered a tragic fate. Launched in 1737, she was of 1920 tons, carried 100 guns and had a crew of 900. She was lost during a gale while off the Casquets in October 1744. Her whole crew perished with her ~ this tragedy caused the name Victory to be deleted, temporarily, from the Admiralty's list of ship names.
This, the fifth Victory, was one of twelve ships ordered by the Navy Board on June 6th 1759 ~ more than 40 years before the battle of Trafalgar for which she is famed. Designed by Sir Thomas Slade, construction began at Chatham Dockyard on July 23rd 1759, the 'marvelous year' (Annus Mirabilis).
This, the year of victories, marked the turning point of the 'seven years war' for Britain. These facts may well have played a significant part in the naming of the vessel and the name Victory being restored to the Admiralty list of ships.
The Caldercraft HMS Victory includes: Double plank on bulkhead construction in lime and walnut, complete with pre-cut gunport strips ~ no more need to tediously mark on and cut out the gunports yourself; 5 different sizes of turned brass cannons; Carronades; 8 sheets of brass etched components; 3 different profiled brass rails; CNC cut walnut and ply components, profiled where necessary; All new scale turned wood belaying pins, support pillars and staircase balusters; All necessary blocks and black / natural hemp for rigging; All 4 ships boats in authentic plank on bulkhead construction; All new scale copper plates.
18 sheets of fully detailed actual size plans and a comprehensive, full colour, step-by-step instruction manual including constructional photos of the prototype. All this enables you to build the most authentic model of H.M.S. Victory as she appeared at Trafalgar. As well as this, the kit also includes the timber work to produce the model to the current specifications as she stands in Portsmouth, for example timberheads, capping and hammock cranes for the forecastle.
Specifications:
Scale: 1:72
Length: 1385mm
Width: 525mm
Height 940mm
Planking: Double
This model has a skill rating of 5
1 being suitable for beginners and 5 being suitable for Experienced modelers.[/b]
The Build Diary
This model was bought for me as a Christmas Present from my family, I first fell in love with HMS Victory when I came face to face with her at Portsmouth Historic Dockyard, after stepping on board, there is something about this ship that inspires you, and from there on, I had a place in my heart for this Historic Ship, and now I have the chance to recreate this magnificent wonder as a display piece in my home, I just hope I do it justice
When the kit arrived, I couldn't wait to get my hands on the box, but after almost giving myself a hernia trying to lift the box alone, the wife helped me carry it into the hobby room.
I was under the impression that I could not touch it, until Christmas day, but my Wife, looked at me and said "I bet you can't wait" I replied "Of course I can love, It's for Christmas" she replied "You Liar" and she was so right lol but to my amazement, she told me I could start it now, as I would be busy at Christmas with the kids.
On opening the Box, this is what I found
The Building Guides

The 18 Plan sheets


The Rigging thread (Just for size comparison, I have included a rigging thread from a Constructor Kit, it's the thread on the bottom of the picture)

Rigging bits

The Cannons

The White metal fittings and copper plates for the hull

I used my plans tube to store some of the finer timber planks


This is a letter from Peter Goodwin. MPhil. IEng. MIMarEST. The Keeper and curator of HMS Victory, to JotiKa, stating that he has reviewed the model and found it to be an accurate representation of how she would have appeared in 1805 at the battle of Trafalgar.

There is also a sheet in the box for you to register your kit with Caldercraft/JotiKa, and they state that if any changes are made to the model, you would receive the added parts free of charge as a registered customer, like the Prince of Wales feather motif.
The Etched brass sheets.
Theses are well detailed


Dave- Admin
- Posts : 34
Join date : 2012-09-11
Location : UK -

Re: Caldercraft's 1:72 Scale HMS Victory
![]() Dave Tue Sep 18, 2012 3:35 pm
Dave Tue Sep 18, 2012 3:35 pm
Making a start
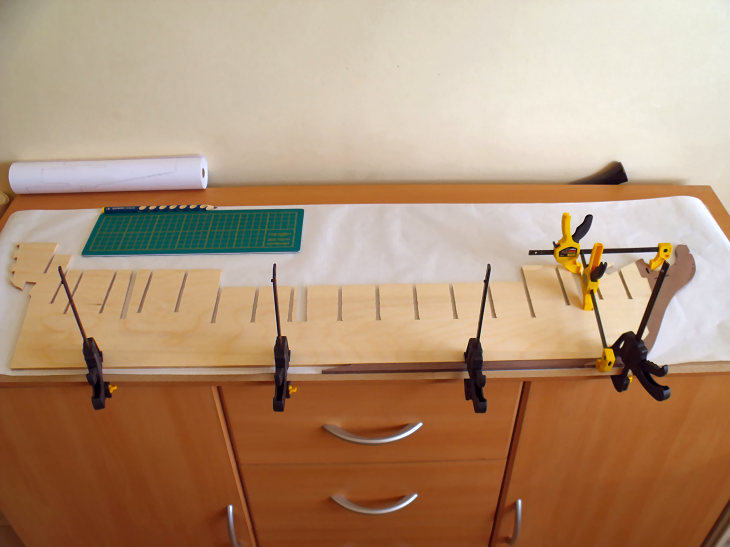
After looking at the plans, book one and the contents of the box, I located the familiar Main Keel and set it down on the build board, on first examination, it was not a pleasant sight, the keel piece had a warp in it, but after wetting it, then using an Iron on the steam setting, I managed to get it flat, but if I dont clamp it down on a flat surface, this curve will re appear.
24 Hours later, after removing the clamp, the piece remained flat, so it's time to locate the Walnut front Keelson and Stem. Placing the parts on a flat build board, I assembled and clamped them together. The white squared paper you can see on the build board is non stick backing paper, this will stop any glue or wood sticking to the build board.

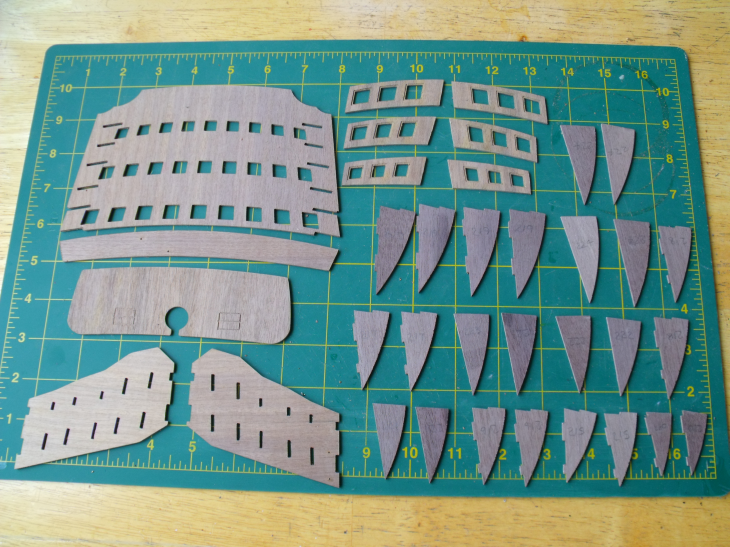
Here are the ribs, ready to be cut out, there are 18 for the first assembly, all 5mm ply, no laser cutting here, everything in this kit has been routed, and it's remarkably accurate!

I have now dry fitted all the bulkheads and to be honest, with a little sanding, they went together like a dream, tight but not too tight as to cause problems.


I have now glued the bulkheads in place, only two needed clamping at 90 degrees to the keel, so I'm well impressed.

I have added the first deck to aid the drying of the bulkheads while keeping the keel in line. The deck and ribs are all cut from 5mm ply.

The Bow forward supports are now glued into place awaiting the gunport patterns

The Stearn Extensions are in place and needed no attention to make them square to bulkhead 18, so fat this kit has been very accurate in the cutting of their parts.


I have finished decking the the middle gun deck, only a small portion of this required decking due to the fact most of this won't be seen once the upper gun deck is in place, but you will be able to see it from the entry ports and gun deck companionways.
I chose to try and keep to scale and went for the 4 butt shift system, using the 1x4mm Tanganyika planks at lengths of 85mm = to 20ft planks with offsets of 34mm for each plank, I then coated them with matt varnish, I am satisfied with the results.


It was time to paint the dummy barrel supports, I was shocked to find that my wife and daughter were keen to lend a hand.

After looking at the plans, book one and the contents of the box, I located the familiar Main Keel and set it down on the build board, on first examination, it was not a pleasant sight, the keel piece had a warp in it, but after wetting it, then using an Iron on the steam setting, I managed to get it flat, but if I dont clamp it down on a flat surface, this curve will re appear.
24 Hours later, after removing the clamp, the piece remained flat, so it's time to locate the Walnut front Keelson and Stem. Placing the parts on a flat build board, I assembled and clamped them together. The white squared paper you can see on the build board is non stick backing paper, this will stop any glue or wood sticking to the build board.
Here are the ribs, ready to be cut out, there are 18 for the first assembly, all 5mm ply, no laser cutting here, everything in this kit has been routed, and it's remarkably accurate!
I have now dry fitted all the bulkheads and to be honest, with a little sanding, they went together like a dream, tight but not too tight as to cause problems.
I have now glued the bulkheads in place, only two needed clamping at 90 degrees to the keel, so I'm well impressed.
I have added the first deck to aid the drying of the bulkheads while keeping the keel in line. The deck and ribs are all cut from 5mm ply.
The Bow forward supports are now glued into place awaiting the gunport patterns
The Stearn Extensions are in place and needed no attention to make them square to bulkhead 18, so fat this kit has been very accurate in the cutting of their parts.
I have finished decking the the middle gun deck, only a small portion of this required decking due to the fact most of this won't be seen once the upper gun deck is in place, but you will be able to see it from the entry ports and gun deck companionways.
I chose to try and keep to scale and went for the 4 butt shift system, using the 1x4mm Tanganyika planks at lengths of 85mm = to 20ft planks with offsets of 34mm for each plank, I then coated them with matt varnish, I am satisfied with the results.
It was time to paint the dummy barrel supports, I was shocked to find that my wife and daughter were keen to lend a hand.
Dave- Admin
- Posts : 34
Join date : 2012-09-11
Location : UK -
Re: Caldercraft's 1:72 Scale HMS Victory
![]() Dave Tue Sep 18, 2012 3:35 pm
Dave Tue Sep 18, 2012 3:35 pm
I didn't have much time to do any modeling over Christmas, just the odd bit here and there as I have been spending more time gaming with the kids, but here are a few images of what I have done so far.

After placing the first cannon pattern in place, it was apparent that I needed to sand a little of the bow area of the deck.
I have now clamped the first of the cannon port patterns in place, I used pins, glue and clamps to hold it in place until dry.


Here is the finished result of the patterns, she is starting to take shape now, and looks awesome.

Here is a comparison photo of DeAgostini's Version (Top) vs Caldercraft's version (Bottom) in this photo, you can see how much bigger the Caldercraft build is.

I have faired the hull, and am waiting for the kids to go back to school to start the planking.
There were some missing parts, but after a call to Jotika, the parts were in the post by the end of the phone call, you just cannot fault the service.
I have now managed to get on with the 1st planking with huge thanks for the support of my wife, who has been a huge inspiration and also helped with each plank, it's been a huge challenge with limited use of my one hand, but I am somewhat surprised and satisfied with the results.


I started work on the Quarter galleries yesterday, I have to be honest and say, this was a bloody nightmare with one hand, I almost gave up, but after a beating from the wife and a good talking too, I managed to get it right, as right as I want it to be lol.
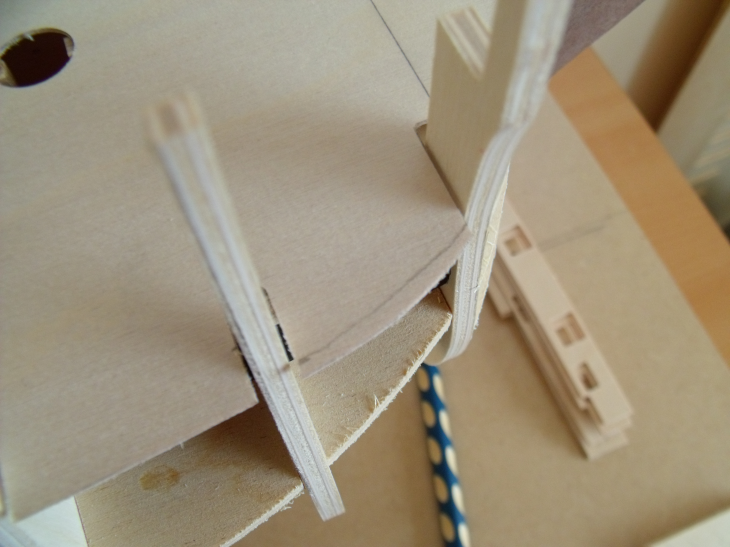
This image shows all the pieces needed in order to correctly place the two side templates and the stern inner faceplate, all pieces have to be held in place at the same time to correctly position the side and rear templates.


I hope to get more done today, time will tell lol.
The Lower Stern counter pattern is only temporarily pinned in place, this was for the fitting of the Stern Fascia.
You will need to soak this piece in water but be careful as the glue used in the laminating of this ply is water soluble, so only soak for about 8 Min's, then offer the piece into place, only bending a bit at a time, use a wet rag placed over the surface if the piece dries out.
I only removed what material I needed to from the stern, in order for a nice neat fit of the lower counter pattern.


The wife and I have done a little more on the build, so here are some pics to keep you updated, there are some minor mistakes, but this is not a problem, especially now I have come to terms with my condition and the fact it will be a ship built with the huge help from my wife, who I could not manage without!!!!


After placing the first cannon pattern in place, it was apparent that I needed to sand a little of the bow area of the deck.
I have now clamped the first of the cannon port patterns in place, I used pins, glue and clamps to hold it in place until dry.
Here is the finished result of the patterns, she is starting to take shape now, and looks awesome.
Here is a comparison photo of DeAgostini's Version (Top) vs Caldercraft's version (Bottom) in this photo, you can see how much bigger the Caldercraft build is.
I have faired the hull, and am waiting for the kids to go back to school to start the planking.
There were some missing parts, but after a call to Jotika, the parts were in the post by the end of the phone call, you just cannot fault the service.
I have now managed to get on with the 1st planking with huge thanks for the support of my wife, who has been a huge inspiration and also helped with each plank, it's been a huge challenge with limited use of my one hand, but I am somewhat surprised and satisfied with the results.
I started work on the Quarter galleries yesterday, I have to be honest and say, this was a bloody nightmare with one hand, I almost gave up, but after a beating from the wife and a good talking too, I managed to get it right, as right as I want it to be lol.
This image shows all the pieces needed in order to correctly place the two side templates and the stern inner faceplate, all pieces have to be held in place at the same time to correctly position the side and rear templates.
I hope to get more done today, time will tell lol.
The Lower Stern counter pattern is only temporarily pinned in place, this was for the fitting of the Stern Fascia.
You will need to soak this piece in water but be careful as the glue used in the laminating of this ply is water soluble, so only soak for about 8 Min's, then offer the piece into place, only bending a bit at a time, use a wet rag placed over the surface if the piece dries out.
I only removed what material I needed to from the stern, in order for a nice neat fit of the lower counter pattern.
The wife and I have done a little more on the build, so here are some pics to keep you updated, there are some minor mistakes, but this is not a problem, especially now I have come to terms with my condition and the fact it will be a ship built with the huge help from my wife, who I could not manage without!!!!
Dave- Admin
- Posts : 34
Join date : 2012-09-11
Location : UK -
Re: Caldercraft's 1:72 Scale HMS Victory
![]() Dave Tue Sep 18, 2012 3:37 pm
Dave Tue Sep 18, 2012 3:37 pm
I haven't been doing too much building of late, Summer is here and the kids off from school, these combinations don't usually mix, modeling and bored kids.
I have made a start on the second planking, so far it's going great, I also remembered to taper the stern of the hull for the second layer.


Here are some long overdue pictures of my build so far! I now have a working camera after some really desperate begging to the wife
I am showing my pictures before and after sanding, I feel this is needed as some builders like to show you images of their finished work, I don't think this is helpful to any new to the hobby modelers, as they see their rough work, thinking that they have failed and cannot achieve a great finish.
I am no expert, and I do not claim to be, but I am happy with what I achieve, and so should you! Do not let anyone make you think or feel otherwise, but always seek to improve, and always be welcome to helpful and constructive advice NOT CRITASISM!
This picture shows me using masking tape to achieve the correct angle of the cut needed to make a neat joint at the bow of the ship.

Once the masking tape has been pressed into place, I cut off what's not required, then attach the resulting tape to a plank, then using a sharp craft knife, I cut off the excess following the line of the tape, this method has always worked for me, I trust it more than trying to cut by eye

I start planking down the hull until I get about half way, thats when I usually start to install the Garboard plank, I have in the past made the mistake of trying to plank all the way down to the keel, and have always ended up trying to fit a multi-shaped piece of timber followed by numerous swear words and scrap wood!


Hey I am almost finished the second planking! Phew!!! and the ship is still in one piece! so far


Woohoooo, I am done, all that is needed now is a final sanding to achieve a smooth finish and shape.

Images of the sanded finish will be uploaded as soon as I clean up
I have made a start on the second planking, so far it's going great, I also remembered to taper the stern of the hull for the second layer.
Here are some long overdue pictures of my build so far! I now have a working camera after some really desperate begging to the wife
I am showing my pictures before and after sanding, I feel this is needed as some builders like to show you images of their finished work, I don't think this is helpful to any new to the hobby modelers, as they see their rough work, thinking that they have failed and cannot achieve a great finish.
I am no expert, and I do not claim to be, but I am happy with what I achieve, and so should you! Do not let anyone make you think or feel otherwise, but always seek to improve, and always be welcome to helpful and constructive advice NOT CRITASISM!
This picture shows me using masking tape to achieve the correct angle of the cut needed to make a neat joint at the bow of the ship.
Once the masking tape has been pressed into place, I cut off what's not required, then attach the resulting tape to a plank, then using a sharp craft knife, I cut off the excess following the line of the tape, this method has always worked for me, I trust it more than trying to cut by eye
I start planking down the hull until I get about half way, thats when I usually start to install the Garboard plank, I have in the past made the mistake of trying to plank all the way down to the keel, and have always ended up trying to fit a multi-shaped piece of timber followed by numerous swear words and scrap wood!
Hey I am almost finished the second planking! Phew!!! and the ship is still in one piece! so far
Woohoooo, I am done, all that is needed now is a final sanding to achieve a smooth finish and shape.
Images of the sanded finish will be uploaded as soon as I clean up
Dave- Admin
- Posts : 34
Join date : 2012-09-11
Location : UK -
Re: Caldercraft's 1:72 Scale HMS Victory
![]() Dave Tue Sep 18, 2012 3:41 pm
Dave Tue Sep 18, 2012 3:41 pm
Just a couple of pics to update my build.
I have now cut out the lower deck main mast sleeves, there are two pieces which need to be glued together, my only advice is you do this with a gentle hand as they can break easily on the grain, so to help make them stronger, I glued them together whiles crossing the grain.


Once dry, I filed the inner of the pieces enough to allow the main mast to pass through without any resistance. I also sanded the outer of the sleeve ready for a couple of coats of Matt varnish.


Once I was happy with the sleeve, I dry fitted it to the deck and made sure the mast would pass through unobstructed and at the correct angle.

I know this is not ralated to the part I am working on but it's a great tip so thought I would include it in the build diary.
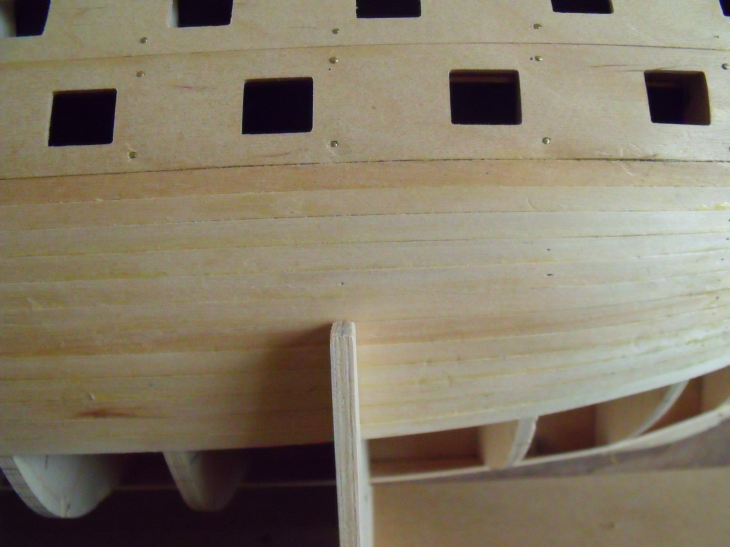
When cutting out the gun ports, the timber used can sometimes feather then splinter and break, if this happens it can be a task to get a nice finish without using filler, so what I do, I spread a small amount of medium or thin super glue (Cyanoacrylate) over the area to be cut, this helps to stop the edges feathering or splitting.
Without glue

With glue

I have now cut out the lower deck main mast sleeves, there are two pieces which need to be glued together, my only advice is you do this with a gentle hand as they can break easily on the grain, so to help make them stronger, I glued them together whiles crossing the grain.
Once dry, I filed the inner of the pieces enough to allow the main mast to pass through without any resistance. I also sanded the outer of the sleeve ready for a couple of coats of Matt varnish.
Once I was happy with the sleeve, I dry fitted it to the deck and made sure the mast would pass through unobstructed and at the correct angle.
I know this is not ralated to the part I am working on but it's a great tip so thought I would include it in the build diary.
When cutting out the gun ports, the timber used can sometimes feather then splinter and break, if this happens it can be a task to get a nice finish without using filler, so what I do, I spread a small amount of medium or thin super glue (Cyanoacrylate) over the area to be cut, this helps to stop the edges feathering or splitting.
Without glue
With glue
Dave- Admin
- Posts : 34
Join date : 2012-09-11
Location : UK -
Re: Caldercraft's 1:72 Scale HMS Victory
![]() Dave Tue Sep 18, 2012 3:44 pm
Dave Tue Sep 18, 2012 3:44 pm
I am still currently working on the upper gun deck, here are some of the images.
Here I have fitted and glued into position the upper gun deck camber beams, I had to check the plans 3 times to make sure I had them in the correct locations, YES thats how forgetful I am getting

Time to fit the upper gun deck, this 0.8mm ply piece only required a small trim to get it fitting nice and snug thanks to the quality of workmanship from the guys at Jotika.

I did have to sand down the inner bulwarks to get them aligned correctly.

I cut all the planks to size as recommended by the guys at Jotika, each plank was cut to 85mm, I achieved a continuous plank length by clamping a scrap pice of timber to my building board, then clamping my cutting box at the correct plank length, a simple solution for a simple mind
I used the 4 butt shift system to lay the planks after marking one side of each plank with a pencil, it can be a bit messy (especially if your me and have hands that just don't do what they are told) I could have cleaned up with a damp cloth as I went, but I don't like doing this as a damp or wet plank could swell up and become a pain in the rear end when it starts to shrink, this would have left gaps all over the place, so I decided to adopt the "I will sand it down when I have finished" method, it's worked for me in the past.

Planks have dried and have now received their first sanding.


I have now applied a coat of Matt Varnish and I am pleased with the results. (Ronseal Diamond Hard Varnish-CLEAR)

Here I have fitted and glued into position the upper gun deck camber beams, I had to check the plans 3 times to make sure I had them in the correct locations, YES thats how forgetful I am getting
Time to fit the upper gun deck, this 0.8mm ply piece only required a small trim to get it fitting nice and snug thanks to the quality of workmanship from the guys at Jotika.
I did have to sand down the inner bulwarks to get them aligned correctly.
I cut all the planks to size as recommended by the guys at Jotika, each plank was cut to 85mm, I achieved a continuous plank length by clamping a scrap pice of timber to my building board, then clamping my cutting box at the correct plank length, a simple solution for a simple mind
I used the 4 butt shift system to lay the planks after marking one side of each plank with a pencil, it can be a bit messy (especially if your me and have hands that just don't do what they are told) I could have cleaned up with a damp cloth as I went, but I don't like doing this as a damp or wet plank could swell up and become a pain in the rear end when it starts to shrink, this would have left gaps all over the place, so I decided to adopt the "I will sand it down when I have finished" method, it's worked for me in the past.
Planks have dried and have now received their first sanding.
I have now applied a coat of Matt Varnish and I am pleased with the results. (Ronseal Diamond Hard Varnish-CLEAR)
Dave- Admin
- Posts : 34
Join date : 2012-09-11
Location : UK -
Re: Caldercraft's 1:72 Scale HMS Victory
![]() Dave Tue Sep 18, 2012 3:44 pm
Dave Tue Sep 18, 2012 3:44 pm
I haven't done much to the ship as I have been working on the cannon monogram, but here I have lined the upper ports.

Here is the result of my attempted monogram, using brass wire and games workshop green stuff, the idea comes from two people, one from the DeAg forums, and the other from the Games Workshop community.
This method of making a stamp to replicate crests and armour pieces has been going around for a long time, it's a great idea, but you do require good eyes and allot of patients


Now to make the negative mould using green stuff.

to make a handle for it, I just took an old craft knife handle, removed the Collete and sheath, then rolled the negative mould green stuff into a sausage, forcing it into the handle while twisting it, this will once hardened, grip on the inner thread of the handle, holding the green stuff in place, I then rolled the whole thing on a tile to shape the round end, then pressed it onto the positive template I made and presto!

I need to give it a couple of days to harden, then test it out on the cannons.
Here is the result of my attempted monogram, using brass wire and games workshop green stuff, the idea comes from two people, one from the DeAg forums, and the other from the Games Workshop community.
This method of making a stamp to replicate crests and armour pieces has been going around for a long time, it's a great idea, but you do require good eyes and allot of patients
Now to make the negative mould using green stuff.
to make a handle for it, I just took an old craft knife handle, removed the Collete and sheath, then rolled the negative mould green stuff into a sausage, forcing it into the handle while twisting it, this will once hardened, grip on the inner thread of the handle, holding the green stuff in place, I then rolled the whole thing on a tile to shape the round end, then pressed it onto the positive template I made and presto!
I need to give it a couple of days to harden, then test it out on the cannons.
Dave- Admin
- Posts : 34
Join date : 2012-09-11
Location : UK -
Page 1 of 1
Permissions in this forum:
You cannot reply to topics in this forum|
|
|